
Nothing lasts forever. A bike chain is no exception. And when its time is up, you want to be ready with a replacement. Here’s how to tell when that time has come.
______________________________
by Tamia Nelson | July 21, 2012
A bicycle chain looks simple, but it’s not. It’s a complex and highly engineered system, comprising plates, pins, rollers, and bushings—some 500-600 individual parts in all. And these parts wear. Pins chafe against bushings. Bushings fret against rollers. Regular cleaning and lubrication can delay the inevitable, but sooner or later every chain succumbs to the patient gnawing of steel against steel. In other words, bike chains “stretch.” The pin-to-pin distance increases over time, and in time the chain rides higher on the sprocket teeth, eventually deforming them.
The result? If neglected for too long, your chain starts to skip blithely over the sprockets without engaging the teeth, leaving you spinning your heels furiously while going nowhere—not a good thing to happen just as you’re accelerating to take advantage of a brief lull in oncoming traffic. And the remedy? Well, to begin with, you have to replace the worn chain with a new one. That much is obvious. But by the time a chain has started skipping, it’s probably done so much damage to the sprockets that you’ll need to replace your cassette or freewheel, too. New chains don’t mesh well with worn sprockets, and if you decide to keep your old cluster, the skipping will likely continue. It may even get worse. Nor is this all. If you’ve really let things go, you may also need one or more new chainrings.
That can get costly. Luckily, though, it’s not hard to avoid this worst-case scenario. Simply check your chain for wear before each monthly cleaning, replacing it when the stretch exceeds one-half of one percent. And you can buy a number of simple go-no-go gauges to make the job easy. Here’s one, a Park CC-3:
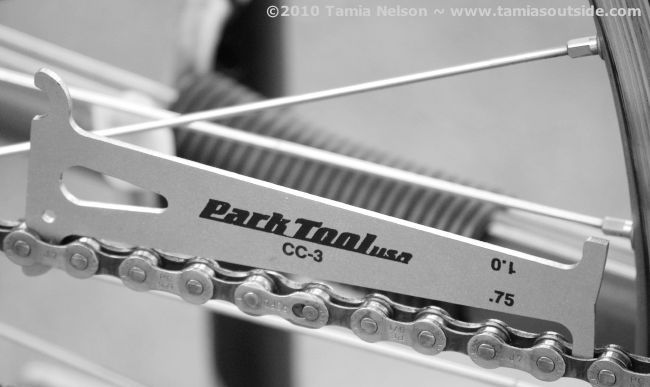
With such a gauge, your chain either passes or fails. There’s no ambiguity. But there are a couple of snags with this quick-and-easy approach. To begin with, not all go-no-go gauges flag a chain as failing at the critical one-half of one percent threshold, increasing the likelihood that you’ll be shopping for a cassette or freewheel, as well. (My Park CC-3 doesn’t go lower than 0.75 percent, for instance, though its successor, the CC-3.2 does. The CC-3.2 also costs ten bucks.) And then there’s another little gotcha: Many (most?) go-no-go chain gauges are subject to Type I errors. In other words, they’re prone to false alarms, failing chains that still have many miles left in them. This, too, can get costly. It’s a Catch-22 situation, really. Your handy go-no-go gauge may either (1) let a worn chain slide long enough to damage your cassette, or (2) prompt you to scrap a chain before its time. In either case, you’re out of pocket.
Let’s recap. Riding with a worn chain can leave you stranded in the middle of an intersection, at the mercy of impatient motorists. It can also cost you a lot of money. (Have you priced cassettes lately?) But simple go-no-go gauges can trick you into replacing perfectly serviceable chains, to say nothing of costing a pretty penny themselves. There has to be a better way.
And there is. But you’ll need another tool. It’s called a ruler. Just measure 24 links* of your chain, from pin to pin. The pins of a new bicycle chain are spaced exactly one-half inch apart. Which means that 24 links of a new chain will measure exactly 12 inches. So if your chain measures, say, 12 1⁄16 inches, it’s now a candidate for the recycling bin. (That one-sixteenth of an inch of “stretch” represents wear of one-half of one percent.) It’s still safe to use—it’ll be a while before it does expensive damage to your sprockets—but don’t plan on riding too many more centuries with Old Faithful. It’s time to put “bicycle chain” on your shopping list.
What could be simpler? Well, maybe it’s not quite as simple as I’ve made it out to be. You have to put the chain under a little tension to get an accurate measurement. Which means you’ll get your hands dirty. And it helps to have a steel ruler. (It’s easier to clean, for instance.) You’ll also need good near vision. But the real joker in the pack is finding a ruler that’s long enough. Many shop rulers stop at 12 inches. That’s not much help if you need to measure 12 1⁄16 inches, is it? (Some folks use steel tapes successfully to do the job, but I’m not one of them. I find tapes impossibly clumsy. Or maybe I’m the clumsy one.) Moreover, unless you want to remove the chain from your bike—I know I don’t—it’s surprisingly hard to find an unobstructed 12-inch run of chain to measure.
Stalemate? Nope. Just think metric. Twenty links of half-inch chain add up to 10 inches, or 25.4 cm. So use a metric ruler and measure 20 links rather than 24. If the pin-to-pin distance exceeds 25.5 cm by more than a smidgen, it’s time to put “new chain” on that shopping list. And if it exceed 25.6 cm, you may want to add “new cassette,” too, just in case your new chain skips on the sprockets of the old cassette.
The bottom line? Go-no-go chain-wear gauges are handy things. They’re not exactly cheap, however, and they can trick you into retiring a chain when it still has plenty of life left in it. But you don’t really have to buy a go-no-go gauge. if you own a ruler, you’ve got the only tool you need to take the measure of your chain.

* I’m using “link” the way most chain manufacturers do. A standard 114-link chain therefore comprises 57 “inner” links and 57 “outer” links. But some writers, the late Sheldon Brown among them, use the word to identify a pair of linked inner and outer elements. In this case, a standard chain has only 57 links. Confusing, isn’t it?
Further Reading
- “Use a Chain Wear Indicator to Improve Drivetrain Longevity”
- “Chain Reaction: The Good, the Bad, and the Ugly”
- “A Clean Bike is a Happy Bike”
Questions? Comments? Just click here!