
Stop trouble before it starts. Look your bike over to be sure everything is in working order before you head out.
______________________________
by Tamia Nelson | April 4, 2015
A bike—especially one that’s hauling gear or pulling a trailer along a rough unpaved road—is a complex machine operating under extreme load in a hostile environment. If just one critical part fails, it means trouble. Luckily, most mechanical problems are easy to fix or cobble together, even in remote areas, and as long as you have the tools to cope. But who wants to begin (or end) a trip with an unscheduled stop for repairs? I’d rather fix what’s broke at home, instead of alongside a mosquito-infested dirt track on the other side of Aintry (remember Deliverance?). That’s why I do a pre-ride check before heading out for rough rides or long treks. The idea’s to stop trouble before it starts. So look your bike over to be sure everything is in working order before you head out. Here’s my list:
Tires Look for cuts, bulges, or badly worn tread. Dig out any small pieces of embedded glass or bits of sharp metal. The orange peeler on a Swiss Army knife works well, as does the tip of a pocket knife blade. Be careful to avoid piercing the tire, though!
Check tire pressures. You’ll need a gauge that fits your valves. If you don’t have one, now’s the time to get it. The recommended inflation pressures are embossed on the sidewalls of most tires. They’re flexible guides. Lower pressures are best on soft stuff like mud and sand (or snow, come to that). Higher pressures are better for firm surfaces like pavement and hard-packed dirt. Gravel roads fall somewhere in the middle. Here’s the logic. Low pressure improves traction and softens the ride, but it also makes you work harder and leaves your wheel rims vulnerable to damage, as well as making flats more likely. High pressure makes pedaling easier and protects your rims, but it hurts traction in sloppy going and transmits every bump in the road right up your spine.
Since I typically don’t go on roads any worse than jeep trails and forest roads, I run around 70 psi on my Schwalbe Marathon 26″ x 1.50″ tires, which have a recommended range of 40-100 psi. Your needs may differ. It’s a good idea to experiment near home. And don’t forget to check your minipump or frame pump at home, while you’re at it. It’s a real pain to discover that your pump has lost its puff only after you get a flat. I know.
Chain Spin the pedals slowly while you hold the rear wheel off the ground. (A workstand makes this easy.) If the chain is obviously rusty or clotted with gunge, if it squeaks, or if it kinks when going through the rear derailleur, it needs to be cleaned and lubed. A little surface rust on the outer plates is no big deal, but it’s best to err on the side of caution. Don’t lube a dirty chain. Clean it first. You can do the job while the chain’s still on the bike. Use WD-40®, an old toothbrush, and a rag, or spritz on detergent solution from a spray bottle. (If you opt for detergent, spray the chain with WD-40 when you’re done, to displace any water that’s found its way into the rollers.) Clean the rear cog, the two small wheels on the rear derailleur, and the chainrings, too.
Once the clean chain is dry, lube it. Choose an “all-weather” chain lube. Avoid dry lubes. They’re great on the road when it doesn’t rain, but not so good on wet forest trails. Chainsaw bar oil will work in a pinch, and it’s cheap, though cost really isn’t a problem. You won’t be using gallons of the stuff. In fact, since oil holds dirt, less is more. Put a small drop of lube on each roller, and wipe the chain down with an oily rag. That’s it.
If your chain starts squeaking when you’re on the trail, it probably means it’s dry. A small spray can of WD-40 will silence the squeak temporarily, as well as freeing up any stuck links. But don’t expect this quick fix to last long. The oil in WD-40 is very light. There’s no substitute for proper lubrication.
Drivetrain Your cassette—it’s a freewheel on older or cheaper bikes—should run smoothly, as should the jockey and tension wheels on the rear derailleur. If not, try dripping in a little light oil. The stuff you used on your chain will do fine. If this doesn’t put things right, you’ll have to flush out any gunge and relube. It’s a big job. Don’t plan on doing it on the trail.
Check the bottom bracket, too. It should spin easily with no obvious shake. (What’s “shake”? Grab both crank arms and push-pull. Do you feel a little click with each tug? That’s shake.) If it binds or grinds, or if there’s noticeable shake, and if your bike has an “old-fashioned” cup-and-cone bottom bracket, try adjusting the play first. Then try relubing. WARNING! This is NOT a job you want to do on the road. If you have sealed bearings, you’re in luck. They shouldn’t require any attention until they fail. Then you’ll have to replace them.
Derailleurs Work through the gears. Watch for overshoot. You don’t want to throw the chain into the spokes when you shift down into your lowest gear. The other side of the coin—hesitant shifting—is almost as annoying. Either way, lube and adjust as needed.
Brakes These are important, especially in the mountains—or in heavy traffic anywhere. Spin the wheels and apply the brakes. Smooth stop? Good. Or do the brakes drag, bind, or slip? Not good. Inspect and adjust. Be sure your brake levers don’t bottom out against the bars, too. If you’ll be wearing heavy gloves, you’ll want at least one inch of clearance when the brakes are applied. Otherwise, three-quarters of an inch will do. But no less. Adjust as needed.
Wheels While you’re spinning your wheels to check the brakes, look at the wheel rims. Are they centered? They should be. Do they wobble from side to side or hop up and down? If there’s more than an eighth of an inch (3mm) of slop in either direction, you’ll need to “true” the affected wheel. This is one job you’ll probably want to leave to a pro—and not just any pro. If you’re still determined to do it yourself, first get a good repair manual and a junk wheel to practice on. And when you’re ready to tackle your working wheels, take your time.
That’s not all. If the brakes aren’t dragging, both wheels should come to rest slowly and smoothly after being given a spin, with the heaviest bit—usually the spoke with the reflector—ending up on the bottom after a period of back-and-forth oscillation. (The freewheel pawls will prevent the rear wheel from oscillating, but it should still coast smoothly to a stop somewhere past bottom dead center.) If not, you need to back off the cones. On the other hand, if the rims wiggle when you shake them from side to side—try it—the cones are too loose. Tighten them.
One more thing: Make absolutely certain that the quick releases or nuts that hold your wheels in place are secure. Being up the creek without a paddle is nothing compared to hurtling down a hill without a wheel.
Handlebars, Stem, and Headset Except for the headset, which should turn easily without excessive shake—if the bearings are too loose, you’ll probably hear a sharp knock when you brake hard—tight is right here. You wouldn’t drive a car with a loose steering wheel, would you?
Pedals Spin the pedals. If they don’t spin freely, and if they have cup-and-cone bearings, try adjusting the cones first. If that doesn’t fix the problem, they’ll need to be overhauled—disassembled, cleaned, and greased. Be careful. The ball bearings are tiny, and if you lose just one, your pedal is out of action.
Make sure the pedal is screwed tight into the crank, too. WARNING! The left-hand pedal usually has a left-hand thread. It tightens counterclockwise.
Saddle Is the saddle at the right height? Does it have the proper amount of tilt? Reference marks make checking easy. (Use ink or paint. Do NOT scribe lines in the seatpost with an awl.) If the seatpost is fitted with a quick-release, double-check that it’s tight.
Impedimenta Be sure that everything attached to the bike is securely fastened. Pay special attention to the rack(s), bottle cages, and reflectors. And check that your tool kit is where it should be. If you’ll be pulling a trailer, its tires and wheels need the same care that the tires and wheels on the bike get. You’ll also want to be sure the hitch is secure.
The Load Go through your gear list to be sure you haven’t forgotten anything. Check that the load is well-balanced. (Optimal load distribution varies from bike to bike. Experiment near home, well in advance of any long trip.)
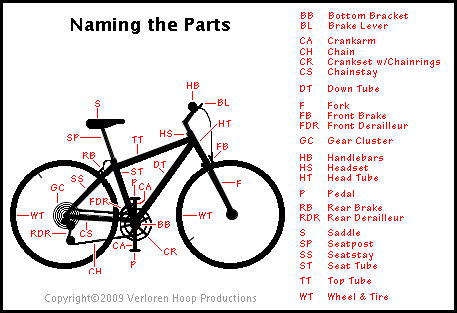
Don’t know where to look for your freewheel or what a seatpost is? Best get a good repair manual. Until you do, though, this should put you in the picture:
OK. You’re ready to hit the trail, but don’t stop listening and looking. As soon as you get under way, check the brakes. Then, as you pedal along, pay attention to any strange sound or unusual vibration, and be alert for any change in steering or braking performance. Mechanical problems don’t go away by themselves. At the first sign of trouble, stop as quickly as possible and put things right—well out of the way of traffic. It’s a policy you can live by.
